 Member Copy
- General Overview
- Step-By-Step
- Tips and Tricks
- Related Tools
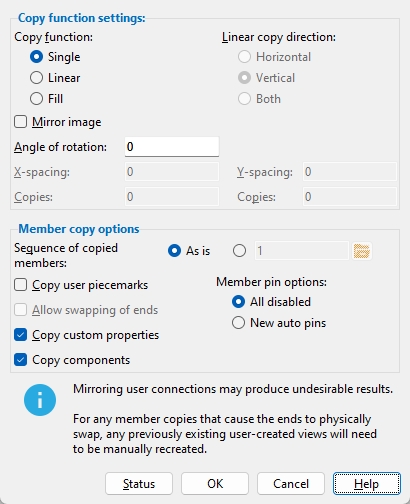
Copy function settings
Copy function: Single or Linear or Fill.
Single generates a single copy of the selected members with options for Mirror and Rotation.
Linear generates multiple Copies of the selected members in the Linear copy direction that you specify.
Fill generates multiple copies of the selected members to fill the X-spacing, X number of Copies and Y-spacing and Y number of Copies.
Linear copy direction: Horizontal or Vertical or Both. This applies when Linear is the Copy function.
Horizontal copies horizontally per the X-spacing distance and the number of Copies.
Vertical copies vertically per the Y-spacing distance and number of Copies.
Both copies diagonally per the X-spacing, Y-spacing and Copies.
Mirror image: ![]() or
or ![]() . This applies when Single is the Copy function.
. This applies when Single is the Copy function.
If this box is checked (
), the new members are mirror images of the originals (their right and left are reversed).
If the box is not checked (
), the new members are brought into the 3D model as exact copies of the originals.
Angle of rotation: Any positive or negative (-) angle from 360 to -360 degrees. This applies when Single is the Copy function.
0 does not rotate the copies of members.
A positive number rotates the copies of members counterclockwise.
A negative number rotates the copies of members clockwise.
Warning: In a view other than a plan view, rotating copies of members may cause members that are invalid to be added.
X-spacing: A positive or negative (-) distance that defines the spacing along the X screen axis, which runs horizontally. This applies only when Fill is the Copy function or Both or Horizontal are the Linear copy direction.
A positive distance adds copies to the right of the selected members.
A negative (-) distance adds copies to the left of the selected members.
Copies: The number (1 or 2 or 3...) of times horizontal you want the X-Spacing to be duplicated.
Y-spacing: A positive or negative (-) distance that defines the spacing along the Y screen axis, which runs vertically. This applies only when Fill is the Copy function or Both or Vertical is the Linear copy direction.
A positive distance adds copies above the selected members.
A negative (-) distance adds copies below the selected members.
Copies: The number (1 or 2 or 3...) of times vertical you want the Y-spacing to be duplicated.
Member copy options
Sequence of copied members: As is or a sequence.
As is gives the copies of members the same sequence as the members that the new members are copies of.
A sequence applies the sequence that is entered to the copies of members.
Copy user piecemarks: ![]() or
or ![]() . Regardless of the choice you make here, all members that were assigned user piecermarks before the Member Copy operation will keep those user piecemarks. This option only affects the new members.
. Regardless of the choice you make here, all members that were assigned user piecermarks before the Member Copy operation will keep those user piecemarks. This option only affects the new members.
If this box is checked (
If the box is not checked (
Warning: It is the user's responsibility to ensure that all members under a user piecemark are exactly the same. Piecemarking does not do this for you. To ensure equivalency of members that are batched under a mark, that mark needs to be a system piecemark.
Allow swapping of ends: ![]() or
or ![]() . This option is enabled (not grayed out) only when the option to
. This option is enabled (not grayed out) only when the option to ![]() Mirror image is checked.
Mirror image is checked.
If this box is checked (
If the box is not checked (
Copy custom properties: ![]() or
or ![]() . By default, this box is checked if User and Site Options > Site > Custom property items to copy > Member/Group member is checked.
. By default, this box is checked if User and Site Options > Site > Custom property items to copy > Member/Group member is checked.
If this box is checked (
If the box is not checked (
Copy components: ![]() or
or ![]() . By default, this box is checked if User and Site Options > Site > Member component items to copy/repeat > Component data is checked.
. By default, this box is checked if User and Site Options > Site > Member component items to copy/repeat > Component data is checked.
If this box is checked (
( set by users. Consequently, if the framing situation for the new members is the same as the framing situation for the original members that they are copies of, the connections on the new members will be exact copies of the connections on the original members. However, if the framing situation for the new members is different than it was for the original members, the retaining of the connection design locks and custom components may not be enough to keep the connections exactly the same and may even result in a connection failure.)
If the box is not checked (
( on the to-be-copied members will be unlocked( on the copies of those members.)
For auto standard connections, connection design may change the connection type even if you have connection design locks set and
Member pin options: All disabled or New auto pins.
All disabled: Member pins on the copied members will be disabled.
New auto pins: Member pins on the copied members will be enabled and automatically set based on framing situation, view plane, and member type.
Status opens a window that is set up per User and Site Options > Site > Member status items to copy/repeat. That window lets you override User and Site Options to set which Member Status Review settings you want to copy ![]() Copy )
Copy )![]() Copy )
Copy )
Red lettering indicates that the corresponding setting in User and Site Options > Site > Member status items to copy/repeat is opposite to the choice
( made here.
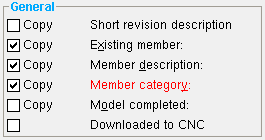
In User and Site Options, Member category is not checked. Here, for Member Copy, the
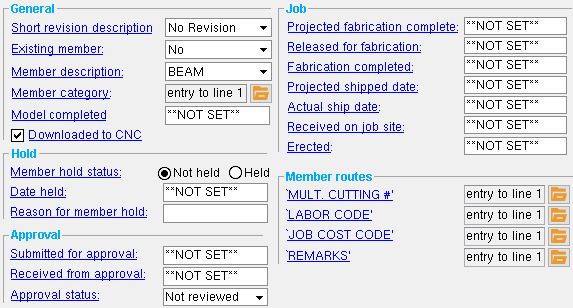
The following chart shows the defaults you get when you choose to not copy the status settings from the original members. That is, when you choose
Default settings for Member Status Review
(Model complete date is on the member edit window)To get these defaults: Press Status here and choose
OK closes the Member Copy Information window and continues the Member Copy operation.
Cancel closes the Member Copy Information window and ends the Member Copy operation. No members will be copied.
1 . Preselect a Member to enable the Members contextual page and click the Member Copy icon found in the Modify section.
Alternative: Invoke Member Copy using the Find Tool by searching the command name and clicking the icon, which is pictured above.
Learn more about alternative methods for launching commands.
2 . The Member Copy Information window appears. When you are done adjusting settings, click the OK button to continue.
Alternative 1: If you did not preselect a member, the status line prompts you to "Select member(s) to copy". Left-click (Select) one or more members and follow step 2 above.
Alternative 2: If Z-filter is checked (
Alternative 3: Press Esc or click Cancel to close the window and end the command.
3 . The status line prompts, "Locate a reference point". Locate - Pan - Return mouse bindings become active along with Locate options. Select the Locate icon you want and left-click (Locate) where you want the reference point.
Alternative 1: If you selected the Linear or Fill copy function in step 2, the status line prompts, "Confirm copy", and Yes - No mouse bindings become active. Left-click (Yes) to copy the member(s) or right-click (No) to end the command.
Alternative 2: If you selected the Linear or Fill copy function in step 2, and the copied members overlap another member line, an alert window appears with the message, "Cannot perform copy. Members would overlap." Click OK to dismiss the window and end the command.
Alternative 3: Press Esc or right-click (Return) to end the command.
4 . The status line prompts, "Locate a second point". Left-click (Locate) where you want the copied member(s) located with respect to the reference point located in step 3.
Alternative 1: If the copied member(s) overlap another member line, an alert window appears with the message, "Cannot perform copy. Members would overlap." Click OK to dismiss the window and repeat step 4 above.
Alternative 2: Press Esc or right-click (Return) to end the command.
5 . The status line prompts, "Confirm copy", and Yes - No mouse bindings become active. Left-click (Yes) to copy the member(s).
Alternative: Right-click (No) to repeat step 4.
6 . The status line prompts, "Locate a second point", allowing you to continue making additional copies of the same member(s) selected in step 1 or 2 using the same reference point located in step 3. Left-click (locate) to create another copy of the member(s).
Alternative: Press Esc or right-click (Return) to end the command.
- Copy To ClipBoard (copy/paste members to a different SDS2 Job)
- Paste From ClipBoard (copy/paste members to a different SDS2 Job)
- Copy Material
- Screen Axes (Topic)
- Member status items to copy/repeat (User and Site Options > Site)

